Tuesday, January 31, 2012

A Really Big Drawing


Check out the wikipedia entry and find out about the men and the photographer of this famous image, http://en.wikipedia.org/wiki/Lunch_atop_a_Skyscraper
I needed some kind of project to keep my hands going after typing all day so I thought I'd do a really big drawing for Any How Town, it's early days yet but the plan is to block in a bunch of characters and then after this rough inking/drawing is finished (see above) I'm going to go over with acrylic/water colour to tone it all. We're at 21 500 words so far and there is no end in sight for the second draft, it's getting stronger and stronger and more and more clear. If you are interested in helping to fund the writing, please go to "the mad craft shoppe" (see links) it's where you can see my paintings that I have for sale and where they are located in Toronto. It's a dream to take the next three months off from painting to write, so expect to see alot more posts here at Any How Town over the next few months. If you have any questions about the characters or the series, just send them along I'd be glad to reply to them here.
best,
A.Shay Hahn
madcraftshoppe@live.com


Wednesday, January 25, 2012

The War Museum


Over the Christmas holidays my best girl and I were in Ottawa spending time with family, one afternoon we went to the War Museum, it was an incredible experience and I highly reccomend it, here' sthe link http://www.warmuseum.ca/home/
Alot of the design of Any How Town is based around a post war look, most of the citizens wear military type garb, use military vehicles etc. their lives are tied to the armed forces and I found the museum to be a great resource and they have some great dioramas that are really worth looking at.
Here's just a small selection of photos that I took there, I realized that I should draw some military propaganda posters to add to the mythos of AHT and there were many great examples.
The Beaverbrook collection of war art is also kept here and there are many fine interpretations of war through the eyes of Canadian artists.
I will soon be posting some new character sketches that I've been doing for Any How Town and will hopefully get another 20.000 words finished in the second draft of Book One by the end of next week, but it has been slow going - I need to eat more oatmeal.
A.Shay Hahn
 

Corin Raymond needs your Canadian Tire money

be a part of a true Canadian caper!
A.Shay Hahn

Tuesday, January 24, 2012

Canadian Tire Cash Caravan pulls into the station

Tonight is the first of two SOLD OUT nights at the Tranzac where Corin Raymond and the Sundowners will be recording their live record, read all about the journey (man I hate that word) here

http://www.dontspendithoney.com/
keep a smile on your face, it's a grey one out there
A.Shay Hahn
madcraftshoppe@live.com

Monday, January 23, 2012

Cats Are Involved, Meme's to follow

(click to enlarge)
If something is truly important on the Internet at some points cats take interest and become involved and it looks like the "Don't Spend It Honey" campaign is no exception.

http://www.dontspendithoney.com/
For those who have asked if these will be available as prints for purchase at the Tranzac, I'm sorry the answer is no, I did these to promote Corin's campaign for Canadian Tire cash because he's a friend and I want to support him. If I were to print and sell them I would have to reshoot them all, lit perfectly, a better camera, pay for printing etc. and that takes me away from why I did them in the first place.
It's fun, just let it be fun and support Corin Raymond.
cheers,
A.Shay Hahn
madcraftshoppe@live.com


Sunday, January 22, 2012

Canadian Tire Dioramas Day #4

Just a short post today, all the info you'll need to send your Canadian Tire money to Corin Raymond is found here at this address http://www.dontspendithoney.com/

have a great day,
A.Shay Hahn
madcraftshoppe@live.com


Saturday, January 21, 2012

Don't Spend It Honey! (Diorama Day #3)


Just a short post today, all the info you'll need to send your Canadian Tire money to Corin Raymond is found here at this address http://www.dontspendithoney.com/

have a great day,
A.Shay Hahn

Friday, January 20, 2012

I hereby do solemnly swear, not to spend it honey

I promised Corin last night that I'd do a diorama every day until the 25th of January, which is the second day of the live recording at the Tranzac, Ragu Lokanathan is opening that night, you have got to hear his stuff, "Blue Girl" is an incredible album.


Once again here's a link to Corin's Fundraising site, and announced today the Stratford Festival is collecting on his behalf, why not join in and set up a donation jar at your place of business/employment, everyone always has some CT money in their wallet or maybe you're like my friend Madman Coupland who donated $70.00 that he had saved up. It feels good to give folks.

Here's Ragu's site
http://www.raghumusic.com/
and here's the Don't Spend It Honey homepage
http://www.dontspendithoney.com/

all the best,
A.Shay Hahn
madcraftshoppe@live.com

Thursday, January 19, 2012

Send Your Canadian Tire Money


Send your Canadian Tire Money To Corin Raymond!
Just thought we'd take a short break from writing to promote one of my favourite musicians.
 Corin is a great singer/songwriter and a generous spirit who promotes the work of other musicians, theatre makers, authors and artists. If you have a stack of Canadian Tire cash, or just some loose bills gathering dust in your home, please take the time and mail it to him, it will not be wasted.
Great stories, news reports and posts from Corin at the link below with an address you can send the cash to or buy tickets for the performances and contribute in other ways.
have a great day,
A.Shay Hahn

Friday, January 6, 2012

Our Hero


There will be a bunch of new character sketches showing up here over the next three months as I get the looks and clothes for our cast locked in, most importantly our young hero Oliver Stinson (shown above).
I remarked many many posts ago that the key to unlocking this series for me was the shift in main characters from the teens of Any How Town to the children. Oliver began as a secondary character when I'd planned AHT to be a graphic novel or comic book series (if you go all the way down to the original character sketches you'll see what I'm talking about) but now is the focus of the first four books. I won't say too much about him here but he is a trusting young guy who is an excellent guide to the world of Any How Town, I still think he looks a little too old in the above sketches but I haven't drawn kids in a long time so I have to get my skills back up to snuff, I'm even thinking of using one of my friend's kids as a model for Oliver just to get it right.
We're heading into Chapter Five today and really enjoying the ride, the first four chapters were all set up and incredibly important, there's so much information that has to be introduced slowly in the first four chapters it really was a trick to get it right, but we're in a good place now.
best,
A.Shay Hahn
madcraftshoppe@live.com

Wednesday, January 4, 2012

Chapter Three Into the Upper Market

I tried to add this as a header to the Any How Town blog but apparently have been refused, so I'll just put it here for now, I may also restage and reshoot it so we can get a few more Gobblers into the picture but of course this is all distraction. Yesterday I began transcribling/rewriting for Book One of Any How Town and it took alot longer than I thought it would, trying to do both jobs at the same time (and hook up the new xbox and make a lasagna) is a little crazy so I have to rethink my strategy if I want to get Book One finished and get into Book Two by the end of January. At some point I'm sure I'll put up a sample chapter here to read to get some feedback but I just haven't decided which chapter that will be. Hope to get to Chapter Five today, I'll keep you posted.
 Over at the Mad Craft Shoppe, where I post my paintings, drawings and designs you can see my work that is hanging at Cowbell Bistro until the 11th of January, check out my dedicated wall of paintings at the Press Club (850 Dundas West) and also to continue funding the writing of this project I have extended my SALE of work from "The Royal Families" (see labels) all 10x12 paintings are $140.00 (instead of $160.00) for the rest of the month, keep the dream alive and pick up some art for your home.
best,
A.Shay Hahn
madcraftshoppe@live.com

Monday, January 2, 2012

Books 1, 2, 3 here we go!


The cast has been patiently waiting for the past few months. While on hiatus they've mostly been hanging out at the Monday Hatred whipering amongst themselves, "When will we get the call ?" "When do we go back to work ?." What do you think he has planned for us, or worse,  has he forgotten about us entirely ?". No, I haven't forgotten, I've been chompin' at the bit to get back to visit Any How Town, building sets and vehicles while finishing paintings down in the studio. As promised it's now January 2012 and I'm settling in for the next three months to finish Books One, Two and Three in the series and compiling all the notes that will take us to the climax of the first story arc in Book Four of the Any How Town series. Expect lots of dioramas and sketches to show up here, clues, hints, and probably alot of crazy babble will be spread over this blog for the next 90 or so days - it should be one helluva ride.
A.Shay Hahn
madcraftshoppe@live.com

Wednesday, December 14, 2011

While the right hand was creating a tutorial


The left hand was using pretty much all the techniques I've described here so far to build this piece to add to the growing collection of Any How Town set pieces. I will note that I used the Titan All Purpose glue to glue the skulls in place and then glued the wooden cubes onto them once they were very secure. I may add a couple more items to this "set" just to give it some more colour. Also the "stone" pieces on the ground and bridge are the ends of the popsicle sticks from the tutorial to apply just put down some glue, spread it about with a wetted paintbrush and sprinkle the pieces over the surface.
A.Shay Hahn
madcraftshoppe@live.com

Building A Popsicle Stick House, Final Steps before painting


So it's time for the trickiest part of building a wee house - attaching the roof. In the post below you can see the beginings of the roof, it's longer than your average popsicle stick, I staggered the pieces to fit across the runners and then added other pieces to fill in the gaps (See Photo #5, last post). Once this is dry you can lean it against the two notched posts that are above the door and back wall, if you need to add another popsicle stick for support go ahead. Once you have the roof glued into place add some more glue to make sure it's secure. I think of using glue like a welder does, add to spots that need more support, once it's dry and secure move onto the next step which you can see in the first photo - filling in the gap between the notched support and the roof, just break off angled bits of popsicle sticks and fit them into the spaces, as you can see it took about four pieces to fill this space in.
 Final Steps - Attaching the door, I used my screwgun with a 1/16 bit to drill two holes in the door and two corresponding holes in the door frame. I took some skinny picture wire and threaded it through the holes then twisted it off with the leaterman to secure it.
 Final Steps - Do another quick tour around your popsicle stick house. Are there any loose spots ? If there are feel free to reinforce these parts with either some more glue or glue another popsicle stick into place to add support.
 It looks like your house is now ready to paint!
A.Shay Hahn
madcraftshoppe@live.com

Tuesday, December 13, 2011

Building A Popsicle Stick House, The Next Steps


Okay while those two walls are drying move on and build your Third wall and set it with the others
 What Step is this Step 7 ?
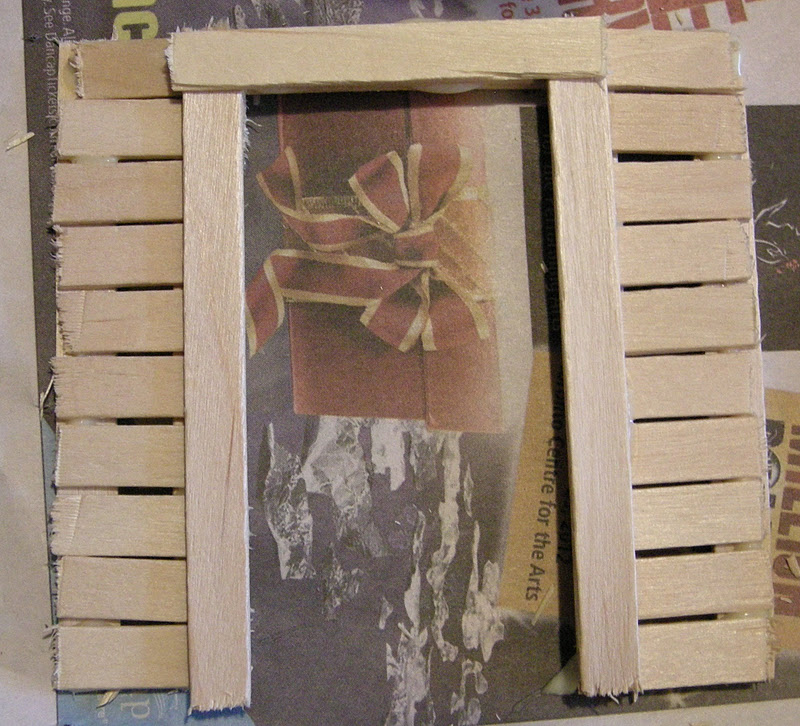
Step 7 Fit your door (see photo) see how I dotted the line, you can either just eyeball it and shorten the door sticks or wait til it dries and snap them off later, it's up to you.
Step 8 Make the floor and side supports, the floor is pretty straightforward, the two side supports are very important for gluing the three walls together so don't forget about them.
Step 9 Attach the Three walls with the two supports. Make sure everything is dry before standing it all up to do this. Add some supports to hold the walls in place, here I was using some of my paints pots. When it's all dry and secure...
Step 10 Secure it to the floor with some glue and let it dry! Also in this photo you can see the two notched pieces of popsicle stick that are going to hold the rood in place. The roof is the trickiest part and that will be the next and last step in the tutorial.
A.Shay Hahn
madcraftshoppe@live.com

Building A Popsicle Stick House, The First Steps.


Step 1: Head to Dollar Store get one (or two why not) bags of Popsicle sticks, here they are called, "Wooden Craft Sticks" which means they have never been touched by the frozen sugary treat commonly known as a posicle. Get your handy dandy Leatherman, you have to own of these, they are indispensable for building popsicle stick anything.
Step 2: Remove the Heads and Tails of the Popsicle sticks, this can be a little tedious, but don't forget you can hold onto the bits that are left over and use them for texture on grounds, they make great little pebbles.
Step 3: DOOR Here's an easy layout for a door and you can move right to Step 4 and lay down your "boards" and build the door frame - set this aside to dry and move onto
Step 5: Window Wall, here's the simple layout for a two window wall, Step 6: It's easy to build window sills for the two window wall just glue in a stick at the top and at the bottom.
 Set this aside to dry, great we have two walls already. (to be continued)
A.Shay Hahn
madcraftshoppe@live.com

Building A Popsicle Stick House, Examples


Alot of traffic comes to the Any How Town blog site looking for instructions on how to build Popsicle stick houses, above you can see several that I've done in the past. The next couple (few? I don't know) posts are going to be a tutorial on how to make your own. I hope you enjoy it.
A.Shay Hahn
madcraftshoppe@live.com

Monday, December 12, 2011

Building A Garage, Popsicle Stick Process


Here's a Sputterjack garage and all the steps it took to build, it was really pretty easy to do. In photos #2 and #3 you can see the various bulldog clips used to keep things in place while they dry, these are indispensable and cut down on your frustration level like you wouldn't believe. It's also important to use things to hold the walls up as they dry, I use my brush cup for support. This model was built in two separate pieces and that adds alot of flexibility for storage. The Basecoat in photo #4 was a little too light so I did add a simple black wash ( black acrylic paint thinned down with water) to add more depth. Remember to always put down newspaper where you're working, sometimes it sticks to the bottom of the model, just peel it off when it's dry.
 I can't wait for 2012 when I take the 600+ pages I've written and the 200 pages of notes to finally put together the first FOUR books of the Any How Town series.
have a great holiday,
A.Shay Hahn
madcraftshoppe@live.com
 also head over to my other blog "the mad craft shoppe" to see my paintings and where they are hanging in Toronto.