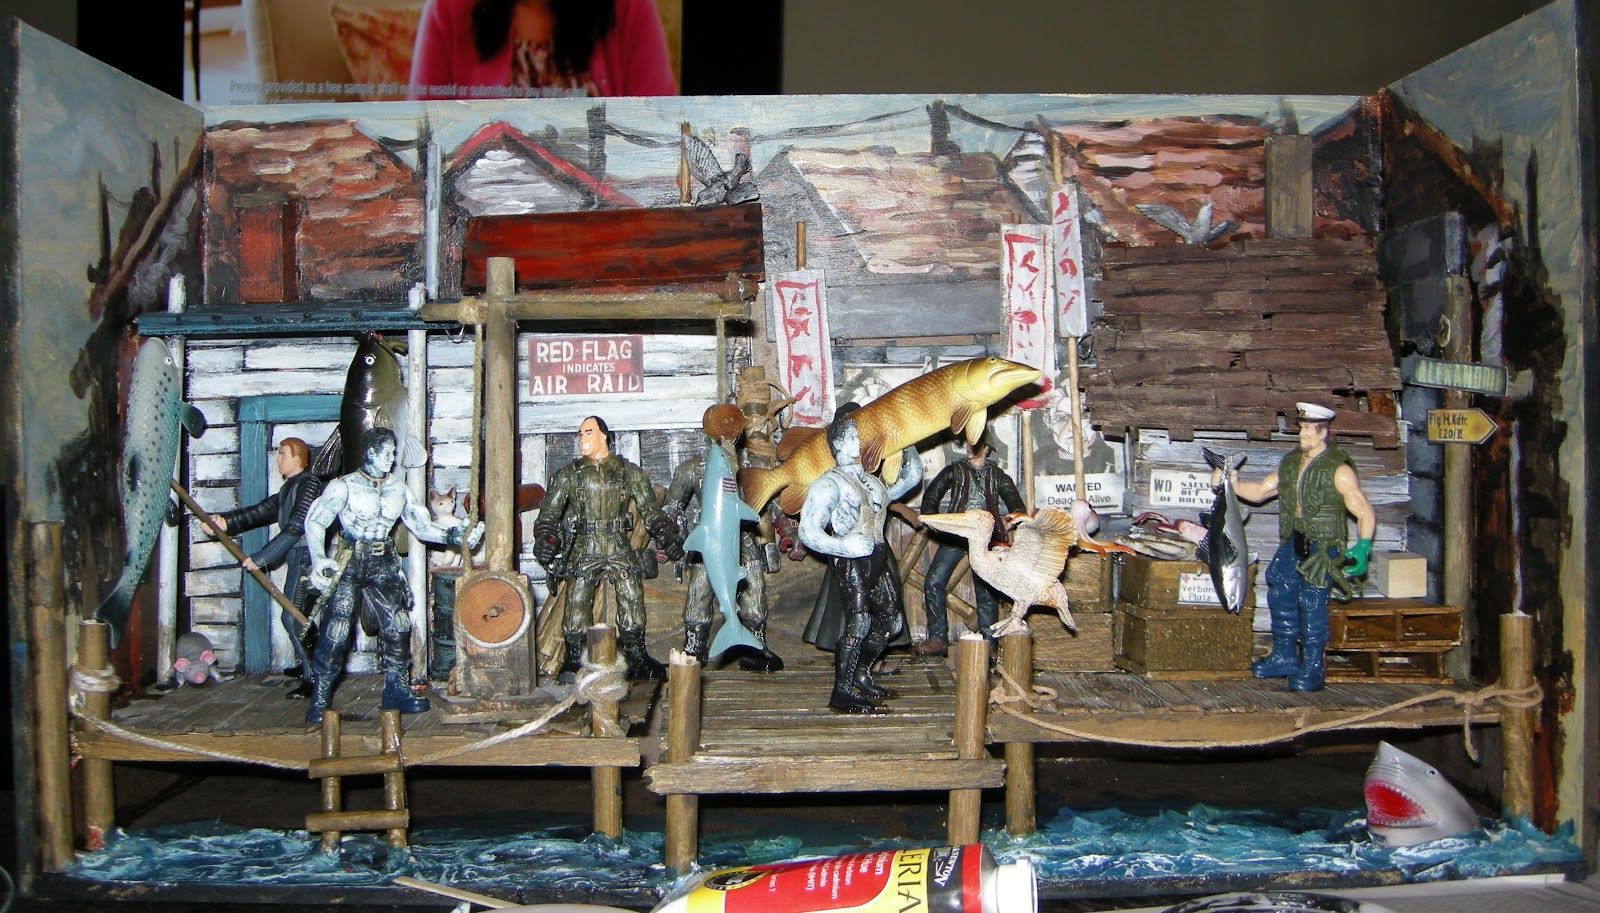
Friday, November 23, 2012

Robot Dino Riders and the Curse of Monopolies


Here's the first of the painted robot dino riders and I know I couldn't have done it without you Dollarama but other smaller dollar stores are closing because of your market domination and I don't like it. I picked up these awesome little wooden kits (just look at that crazy frog) at a store that is being put out of business and these amazing birds (birds are really hard to find, buy them in multiples when you can) from another store that I'm sure is also feeling the pressure.
Variety is the spice of life and I know my kitbashing will suffer if I can only purchase from you, yes you sell some great things for my purposes but you don't sell everything I need. You don't even sell wood glue!
In book news I'm almost finished my hand written edit of Book One and then will do my type edit. I'm pretty thorough when I edit my work and this method just works best for me. The query letter is sharp and the synopses is great so each day we get closer and closer to sending the book out to agents.
Tomorrow is Saturday and from 4-7pm you can come by the Cameron House for the reception for "popular/mechanics" my latest show of paintings. Music will be  provided by Colonel Tom and the American Pour from 6-8pm. If you want to read more and see the work, just head over to the "mad craft shoppe" blog (see links on the right side).
alright, back to work
A.Shay Hahn


Tuesday, November 13, 2012

Building Popsicle Stick Robo Dino Riders!


Here are three of the Dinosaur Kits that I've bashed (kit bashing is a word that's been around a long time that I just learned, it's more or less what I do but originated with more complicated models, like the World War Two model kits) to make two legged vehicles similar to the Sputterjack racing machines.
In Any How Town Book news, the synopses is almost perfect, I'm moving onto getting a solid query letter written this week and I've finished the final edits on the first fifty pages of the first book so things are moving along just as they should.
If you're in downtown Toronto head to the Cameron House to see my paintings, you can preview the show at my other blog, "The mad craft shoppe" (see sidebar,right) and the reception is Saturday, November 24th from 4-7pm.
get your toque on,
A.Shay Hahn

Saturday, November 10, 2012

Ladies and Gents, the Hazard Viper

I've mentioned a couple of action figures of note on this blog before, Battlefield Captain America and The Red Hulk have a new figure to add to their esteemed company, may I present  the G.I Joe Hazard Viper. This guy isn't even a main character, he's a grunt who works with toxins, but geez, just look at that detail! You can see through the goggles, the helmet comes off etc. I just can't say enough about how incredible this figure is and if you head to a winners you can get them for $6.99 !
Mother of Pearl! What a price!
So next week we get into the final edit of Book One and cover letter writing, should be fun, it's high time Book One was finished and sent out for judgement.
Also if you're downtown head to the Cameron House to see "popular/mechanics" a show of my paintings, the reception is Saturday, Nov. 24th from 4-7pm with music by Colonel Tom and the American Pour and some of the wonderful food will be supplied by Chef David Friedman and Red Fish Restaurant.
Head to my other blog "The mad craft shoppe" (see links) to see the work.
A.Shay Hahn

Friday, November 2, 2012

Our Heroes and their friends


I rushed this last drawing and all I can see is a witch riding a broomstick and that will not do. How did this happen? Well, I drew the pose and then started inking it and THEN decided to add the staff, big mistake. Maybe the further we get away from Hallowe'en the more it will look like Jin is just holding a staff, here's hoping.
I also included here (and added to the first post in the drawing series) early sketches of the characters, they are BORING sketches, they don't stand up, Any How Town is an exciting place and those poses are DULL. I also included this Last Airbender figure that I used as a reference but I realize what I have to do in the next attempt at the design of this character is make their outfits unique - simple but totally unique.
A.Shay Hahn

Our Other Hero In Action


Oliver Stinson, reluctant hero
I thought I'd post both pictures that I did of Oliver I want people who come to this blog to see that it's cool to just try things, if you go back to the earlier diorama posts and then go forward you can see how I improved on building things, it took time, it was something that I concentrated on and got better at. Just like drawing, painting, building models, if you keep doing it, you'll get better at it.
That being said, I can also see that in the second picture Oliver's boots are too small, so I'll have to fix those.
keep on making things.
A.Shay Hahn


Our Heroes in Action

 Sinawa Eaglet Rainland, one of our heroes
 If you follow this blog at all you know that I constantly complain about my drawing skills, or lack of time I dedicate to drawing and how I always swear that I will try to draw every day, or at least once a week, or every other month. I wanted to get some action shots down of the characters as they are now not like they were all the way back to when I started this blog. I finished this picture of Eaglet last night and then did a horrible drawing of Oliver, which I'll post with the finished Oliver hopefully later today.
Next week I'm starting in on the final edits/draft of Book One and finishing typing up the second book, yes I wrote all four books in longhand it's just faster for me that way, I want to get Book One out to agents by the end of November and have a great cover letter thingy finished to go with it - fingers crossed.
When I've cracked and can type no more, I'm going to draw, hopefully every second day and get some great action up here to really get people curious about the world of Any How Town.
If you're in Toronto and down town, please head by the Cameron House to see my latest show of paintings, "popular/mechanics" (they open at 4pm) any funds from sales will be going to keeping me working on the AHT series, we're so close to getting Book One ready to go it's driving me crazy.
UPDATE: Here's the sketch of Eaglet I was talking about in the last post, "Our Heroes and Their Friends, do you see how boring this is ?
A.Shay Hahn
madcraftshoppe@live.com

Tuesday, October 23, 2012

Building A Large Scale Popsicle Stick Diorama II

Here's the beginning stages of the second large scale piece, the back alleys of Any How Town a place of gambling, shady deals and leisure.
A.Shay Hahn

Details from Large Scale Popsicle Stick Diorama


Here are some detail shots from the waterfront diorama, having taken a break from it for a couple of days I think I'm going to add more figures to the mix and really give it more a sense of the busy hullaballoo of the Lower Market. Also adding some foreground figures is important, levels and depth are everything when trying to give a piece a real sense of life.
A.Shay Hahn

Thursday, October 18, 2012

Tuesday, October 16, 2012

Big Box of Bits, the end of an era

All of the frames that I've built for my paintings (see "the madcraftshoppe" blog, sidebar) and all of the luon, masonite etc. that I use for the models come from the workshop at Theatre Passe Muraille. Every couple of months I head down and cut up the old 1x3 and whatever else I think I can reuse and I save it from the junkyard. I've been doing this for about three years and that time may be coming to an end. I don't really want to build frames for my paintings anymore I'm just moving on in my head and don't really see frames on the work.
I was down in the shop yesterday and filled a grocery bag with bits this size that I cut down, the pieces range from 1" to 4" and it will be a huge help when I start building the FOUR large scale box dioramas that I plan to make over the next few months. So I'd like to take this time to thank R.McDougall, A.McKim and Theatre Passe Muraille for the oppurtunity that they gave me.
A.Shay Hahn

Building A Popsicle Stick Wheelbarrow


This one is a little trickier, only because you'll be using your drill to make very small holes, so be patient and keep a few extra pieces around in case the wood splits.
PHOTO ONE AND TWO- I had this wheelbarrow that I picked up at a dollar store and new that I needed more of them. I didn't want to spend a bunch of money on them so I figured out a breakdown of how to build one. The base is a little square of masonite that I had a from another wooden kit, I glued down three Pre Stretched Canvas corner pieces (There's that reference again) to make the sides of the wheelbarrow. I then measured two matchsticks and lined them up and drilled a hole for the wheel pin to fit through, this took a couple of tries once I got the hole I then reinforced it with some glue after placing the wheel.
PHOTO THREE - The only mistake I made was that I didn't drill the holes for the handles in advance, so make sure you do that first. Once everything was dry I built the front of the wheel barrows with two popsicle sticks and a coffee stirrer. Once everything was dry I went over it again with glue just to reinforce the areas that looked a little weak.
 I think they turned out pretty well, but I probaby should've built four of them, I've said it before and I'll tell myself this time, multiples are everything, the more you have the more real the diorama will look, it's all about the details.
A.Shay Hahn

Building A Popsicle Stick Push Cart!


These are really easy to make, I suggest  you build four at one go, provided you have enough wheels, it's always about the wheels, ain't it?
PHOTO ONE - Here is the finished product, painted, you can see it is a very simple matter of taking Deserre's Prestretched Canvas corner pieces (If you just said, "What?" You must be new here.) and laying them down, then attach two coffee stirrers to either side. While that dries glue together three popsicle sticks cut to size, this will be the chassis that supports the tip and that the wheels go through.
PHOTO TWO- Here's a view of everything you'll need.
PHOTO THREE- When the popsicle sticks are dry, drill two holes for the axles, cut your mini dowels to size and fit through the holes. Drill another hole in the top piece of your cart, this is where you'll be building the handle. Once everything is dry, just assemble, attach the wheels and then glue them into place.
Now they are ready to paint!
A.Shay Hahn


Friday, October 12, 2012

Building A Popsicle Stick Diorama, Large Scale


Okay, I've decided to go for it, in November I'm going to take all the bits and pieces that you've seen me post over the past few couple of years and buils one large scale diorama piece. I'm heading into the carp shop next week to figure out if I should build it as a box or if there are any better options. So stay tuned
in November and watch the tutorials come together.
Also in Research and Development I bought a few of the dinosaur kits and have started a few crazy builds, these should be fun.
A.Shay Hahn


Tuesday, October 9, 2012

Building Popsicle Stick Vehicles, Research and Development


You never want to get stuck in a rut and just build the same stuff over and over again, sometimes while I'm working on a painting (see madcraftshoppe bog, sidebar) I just glue some pieces together and try to make something new. I had the wheel from the first photo hanging around forever - when I found that the spacing of the pipes matched the holes in the piece that is attached to the undercarriage I knew I had something cool that I could build that I've never done before.
In the second photo you see the cross piece at the front of the vehicle has two separate wheel "arms", this was a real breakthrough and I can't wait to finish this guy. I feel the same about the last photo, when I was building the "Karzas" (scroll down a few posts) I wanted to get to adding a side car to a couple of the vehicles, but I was stuck in my ways and never got around to it - now I have and just look at the results! I haven't quite finished this guy yet, but I'm really glad I pushed the envelope on the design and ended up with a "side car" that shares duties as the front wheel.
Keep experimenting!
A.Shay Hahn

Wednesday, October 3, 2012

Building Popsicle Stick Cages, even more options


Okay, okay these aren't popsicle sticks, they're coffee stirrers and I use them alot for details on things when I'm doing these models. I neglected to take a photo of step one so I'll just tell you-
STEP ONE (no photo) Lay out a grid of coffee stirrers, maybe sixteen by sixteen glue them down and let them dry (okay, fine I'll do a photo next week). Once they are dry cut them up into sections - make sure all sections are the same size. You'll need two for the front and back of the cage and two for the sides.
STEP TWO (photo one) I used some cut up match sticks as interior supports for the cage and let them dry, the photo should make it pretty obviou.s
STEP THREE (photo two) just basecoat in grey and then stipple on some red oxde/burnt umber mix to give it a rusted quality, then find some raffia or other bits to glue into the bottom to make it look like hay.
See ? Super simple.
A.Shay Hahn


Wednesday, September 19, 2012

Building Popsicle Stick Houses, Advanced Edition


Okay, so my "Building Popsicle Stick Houses" tutorials have been viewed many times over so I thought it was time to up the game a bit for anyone out there who wants to move on from those small "fishing shack" or "shed" sized buildings. These photos and the upcoming posts will take us into the more  advanced land of building, you will need all of the techniques that I've taught you so far to get through to the end and be able to call yourself a true "Master of Popsicalia".

PHOTO ONE the first step is to plan what you're doing, just take a bunch of masonite and luon bits and start to arrange them in a way  that appeals. I decided to get this house up off the ground and put down some blocks. I also kept this 21st Century Toys Soldier nearby and use him as a measuring stick and although the fit under the second floor is a little tight, he can still stand comfortably. I used the small dowels for aesthetic effect, and  then glued them into place and supported them with some popsicle stick " floor boards". This step could have waited until the end but I did it anyway.

PHOTO TWO Here's a back view where you can see some popsicle sticks, blocks and other bits that were used to hold things in place. DON'T FORGET to wait for things to dry, you don't want the walls to come crashing down - just slow down trooper.

PHOTO THREE Once everything was set I started in on gluing the "bits", the odds and ends of popsicle sticks that I use to make the ground, you could go get sand and stuff from modelling shops but I'm not into that right now, we'll do a "texture" workshop somewhere down the line, but not soon, there are lots of proper model building sites on the Internet where you can learn those techniques. After that was glued down I used the canvas supports that come with prestretched canvases to make the "cinderblock" wall, it's important to have different looks on your model if you want it to really look "real". Then I began making the "brick" walls, just take a WHOLE BUNCH of popsicle sticks and break them down into brick sized pieces, yes, this is boring, but most hobbies have a boring part- making brick walls is boring, no way around it.

PHOTO FOUR Ebay mail! Look at these great 21st Century dudes, I'll have to swap some heads with other figures but was really happy that these guys showed up.

all for now
A.Shay Hahn
madcraftshoppe@live.com