Wednesday, December 14, 2011

While the right hand was creating a tutorial


The left hand was using pretty much all the techniques I've described here so far to build this piece to add to the growing collection of Any How Town set pieces. I will note that I used the Titan All Purpose glue to glue the skulls in place and then glued the wooden cubes onto them once they were very secure. I may add a couple more items to this "set" just to give it some more colour. Also the "stone" pieces on the ground and bridge are the ends of the popsicle sticks from the tutorial to apply just put down some glue, spread it about with a wetted paintbrush and sprinkle the pieces over the surface.
A.Shay Hahn
madcraftshoppe@live.com

Building A Popsicle Stick House, Final Steps before painting


So it's time for the trickiest part of building a wee house - attaching the roof. In the post below you can see the beginings of the roof, it's longer than your average popsicle stick, I staggered the pieces to fit across the runners and then added other pieces to fill in the gaps (See Photo #5, last post). Once this is dry you can lean it against the two notched posts that are above the door and back wall, if you need to add another popsicle stick for support go ahead. Once you have the roof glued into place add some more glue to make sure it's secure. I think of using glue like a welder does, add to spots that need more support, once it's dry and secure move onto the next step which you can see in the first photo - filling in the gap between the notched support and the roof, just break off angled bits of popsicle sticks and fit them into the spaces, as you can see it took about four pieces to fill this space in.
 Final Steps - Attaching the door, I used my screwgun with a 1/16 bit to drill two holes in the door and two corresponding holes in the door frame. I took some skinny picture wire and threaded it through the holes then twisted it off with the leaterman to secure it.
 Final Steps - Do another quick tour around your popsicle stick house. Are there any loose spots ? If there are feel free to reinforce these parts with either some more glue or glue another popsicle stick into place to add support.
 It looks like your house is now ready to paint!
A.Shay Hahn
madcraftshoppe@live.com

Tuesday, December 13, 2011

Building A Popsicle Stick House, The Next Steps


Okay while those two walls are drying move on and build your Third wall and set it with the others
 What Step is this Step 7 ?
Step 7 Fit your door (see photo) see how I dotted the line, you can either just eyeball it and shorten the door sticks or wait til it dries and snap them off later, it's up to you.
Step 8 Make the floor and side supports, the floor is pretty straightforward, the two side supports are very important for gluing the three walls together so don't forget about them.
Step 9 Attach the Three walls with the two supports. Make sure everything is dry before standing it all up to do this. Add some supports to hold the walls in place, here I was using some of my paints pots. When it's all dry and secure...
Step 10 Secure it to the floor with some glue and let it dry! Also in this photo you can see the two notched pieces of popsicle stick that are going to hold the rood in place. The roof is the trickiest part and that will be the next and last step in the tutorial.
A.Shay Hahn
madcraftshoppe@live.com

Building A Popsicle Stick House, The First Steps.


Step 1: Head to Dollar Store get one (or two why not) bags of Popsicle sticks, here they are called, "Wooden Craft Sticks" which means they have never been touched by the frozen sugary treat commonly known as a posicle. Get your handy dandy Leatherman, you have to own of these, they are indispensable for building popsicle stick anything.
Step 2: Remove the Heads and Tails of the Popsicle sticks, this can be a little tedious, but don't forget you can hold onto the bits that are left over and use them for texture on grounds, they make great little pebbles.
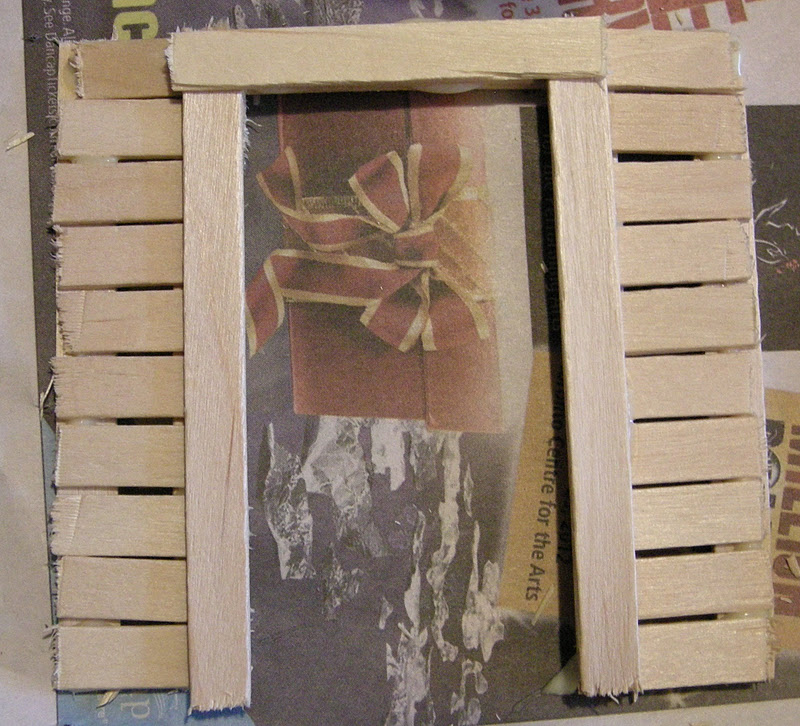
Step 3: DOOR Here's an easy layout for a door and you can move right to Step 4 and lay down your "boards" and build the door frame - set this aside to dry and move onto
Step 5: Window Wall, here's the simple layout for a two window wall, Step 6: It's easy to build window sills for the two window wall just glue in a stick at the top and at the bottom.
 Set this aside to dry, great we have two walls already. (to be continued)
A.Shay Hahn
madcraftshoppe@live.com

Building A Popsicle Stick House, Examples


Alot of traffic comes to the Any How Town blog site looking for instructions on how to build Popsicle stick houses, above you can see several that I've done in the past. The next couple (few? I don't know) posts are going to be a tutorial on how to make your own. I hope you enjoy it.
A.Shay Hahn
madcraftshoppe@live.com

Monday, December 12, 2011

Building A Garage, Popsicle Stick Process


Here's a Sputterjack garage and all the steps it took to build, it was really pretty easy to do. In photos #2 and #3 you can see the various bulldog clips used to keep things in place while they dry, these are indispensable and cut down on your frustration level like you wouldn't believe. It's also important to use things to hold the walls up as they dry, I use my brush cup for support. This model was built in two separate pieces and that adds alot of flexibility for storage. The Basecoat in photo #4 was a little too light so I did add a simple black wash ( black acrylic paint thinned down with water) to add more depth. Remember to always put down newspaper where you're working, sometimes it sticks to the bottom of the model, just peel it off when it's dry.
 I can't wait for 2012 when I take the 600+ pages I've written and the 200 pages of notes to finally put together the first FOUR books of the Any How Town series.
have a great holiday,
A.Shay Hahn
madcraftshoppe@live.com
 also head over to my other blog "the mad craft shoppe" to see my paintings and where they are hanging in Toronto.